
Related posts
Feature
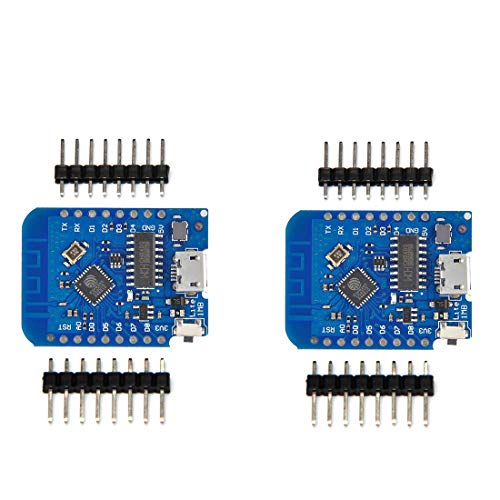
This is a powerful Internet of things development board; standalone board mount, stackable on top, or stackable top and bottom.Although these D1 Minis have only 16 pins, you're still getting 10 digital I/O and the one A0 analog pin, a reset pin, plus the ground and one 3 volt and one 5 volt pin. This is enough for most projects. After all, you do get the hardware I2C and SPI pins (on D5 through D8).
This D1 definitely fits on a standard breadboard leaving one open hole available for each pin (on both sides) but being shorter than the 30 pin boards you will have about 6 more rows available for prototyping, especially nice when using the short 460 tie point breadboards.
11 digital input / output pins, all pins with interrupt / PWM / I2C / support 1 line (except D0); 1 analog input(3.2V max input). Micro USB connection; Compatible with Arduino; 1MB Flash; 500mA resettable fuse.
Be aware that the old driver can cause your machine to lock up. If you installed an earlier version of the driver (the one I had had no version number in the file name) search for instructions to remove it.
Description
Features:11 digital input / output pins, all pins with interrupt / PWM / I2C / support 1 line (except D0)
1 analog input(3.2V max input)
Micro USB connection; Compatible with Arduino
1MB Flash
500mA resettable fuse
A Micro USB connection
Board Size: 3.4x2.5cm/1.34x0.98inch.
Tips:
* For the pin layout, Google "Wemos mini NodeMcu". For example D5 is equivalent to GPIO 14.
* Solder properly. Use a LED to test if it will lit.
Pros:
* Smaller form than the standard NodeMcu
* 4Mb flash memory
* Solid build
* Usb power works
* Works well with Micropython firmware
* The Nodemcu/Lua firmware also works fine
Steps for usage:
* Download the Arduino IDE from the arduino.cc site at en/Main/Software.
* I found an OSX driver for the board at github.com on "adrianmihalko" 's page. You will want the files under the ch340g-ch34g-ch34x-mac-os-x-driver repository.
* Once both of these are installed open up the Arduino IDE.
* Go into the preferences and add the url as stated in the product description above (sorry can't post the url here).
* In the "Board Manager" search for and install the latest version of the "esp8266" generic module.
* Select the new "Port" added by the driver: (mine was "/dev/cu.wchusbserial14120").
* Set the "Reset Method" to: nodemcu.
* All done!
You'd better to write a simple "blink" sketch and upload it to your board to see it work.
The LED pin on this board is "2".
Package Including:
2* D1 Mini Development Board