
Related posts
Feature
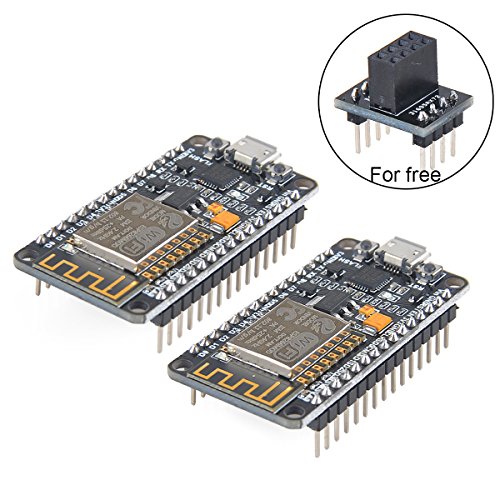
The chip model: CP2102; There is the way to guide you to use the new version: The command you needed to use is: esptool.py --baud 115200 --port /dev/tty.SLAB_USBtoUART write_flash -fs 32m -ff 80m --flash_mode dio 0x00000 boot_v1.7.bin 0x1000 user1.bin 0x37c000 esp_init_data_default.bin 0x37e000 blank.bin The important part is "-flash mode dio" https://github.com/espressif/esptool/wiki/SPI-Flash-Modes;Firmware link: https://github.com/nodemcu/nodemcu-firmware; Data download access to the website: http://www.nodemcu.com; Test Video: https://www.youtube.com/watch?v=Gh_pgqjfeQc; Makerfocus nRF24L01+ and ESP8266 ESP-01 Breadboard Breakout Adapter Board is come for free, it can compatible with "nRF24L01+ " and ESP8266 ESP-01. If you need more information about it, pls refer to: https://www.amazon.com/dp/B01N5AK6E1;
ESP8266 is a highly integrated chip designed for the needs of a new connected world. It offers a complete and self-contained Wi-Fi networking solution, allowing it to either host the application or to offload all Wi-Fi networking functions from another application processor.
ESP8266 has powerful on-board processing and storage capabilities that allow it to be integrated with the sensors and other application specific devices through its GPIOs with minimal development up-front and minimal loading during runtime. Its high degree of on-chip integration allows for minimal external circuitry, and the entire solution, including front-end module, is designed to occupy minimal PCB area;
We Have a Strong After-sales Service Team: As long as you have any questions about the product, we will resolve your issue immediately if received your email, your satisfactory purchase experience is our greatest hope! How to email us? Plz click "MakerFocus" and click "Ask a question" to email us! Looking forward to your consultation!
Description
Instruction & Steps of How to use:1. Download the Arduino IDE, the latest version.
2. Install the IDE
3. Set up your Arduino IDE as: Go to File->Preferences and copy the URL below to get the ESP board manager extensions: http://arduino.esp8266.com/stable/package_esp8266com_index.json Placing the http:// before the URL lets the Arduino IDE use it...otherwise it gives you a protocol error.
4. Go to Tools > Board > Board Manager> Type "esp8266" and download the Community esp8266 and install.
5. Set up your chip as:
Tools -> Board -> NodeMCU 1.0 (ESP-12E Module)
Tools -> Flash Size -> 4M (3M SPIFFS)
Tools -> CPU Frequency -> 80 Mhz
Tools -> Upload Speed -> 921600
Tools-->Port--> (whatever it is)
6. Download and run the 32 bit flasher exe at Github(Search for nodemcu/nodemcu-flasher/tree/master/ at Github) github.com/nodemcu/nodemcu-flasher/tree/master/Win32/Release Or download and run the 64 bit flasher exe at: github.com/nodemcu/nodemcu-flasher/tree/master/Win64/Release
7. In Arduino IDE, look for the old fashioned Blink program. Load, compile and upload.
8. Go to FILE> EXAMPLES> ESP8266> BLINK, it will start blinking.
Note: Please contact us if you need the driver or meet any issue when using. We provide 100% satisfication service for customers.
Package Including
2 * ESP8266 ESP-12E NodeMcu Development Board
1 * "nRF24L01+" and ESP8266 ESP-01 Breadboard Breakout Adapter Board(for free)